 I often describe building keyboards like building Lego. Perhaps being obsessed with Lego as a kid prepared me for assembling keyboards, computers, and accessories. But what happens when you take Lego-like (not officially licensed) blocks and combine them with a keyboard? You get one of KBDcraft’s keyboards made from toy building blocks. I picked up the “Lilith” kit.
The case itself is made from plastic interlocking blocks. They’re Lego-compatible, so you can add to it or change it in any way you desire with your own Lego blocks. In this building block case, you get a gasket mount plate and PCB, mounted at a comfortable 5.5º angle. The full kit includes keycaps and linear switches, but I’m not a fan of linear switches, so I brought my own switches and keycaps. For this build, I went with some silent yet tactile Boba U4 switches, and MT3 profile keycaps from Drop. The goal was to mitigate what I assumed would be a clacky keyboard due to the plastic building block construction. I may have been worried over nothing, as I created what is certainly my quietest mechanical keyboard. It was a blast to put together, so I thought I’d share it with you.
In This Article:
Adam vs Lilith

I’ll save you the translation, it says “Hello, Lilith (Ririsu).”
No, this isn’t a Biblical story. Although Lilith is one of my favorite characters in mythology. The names, it would seem, are actually inspired by the Evangelion anime, which took the names from folklore. I can’t say I follow the anime, but I can’t fault a creator for using their favorite media for themes. After all, I regularly slip Easter eggs from media I like into my articles. Have you spotted them ever?
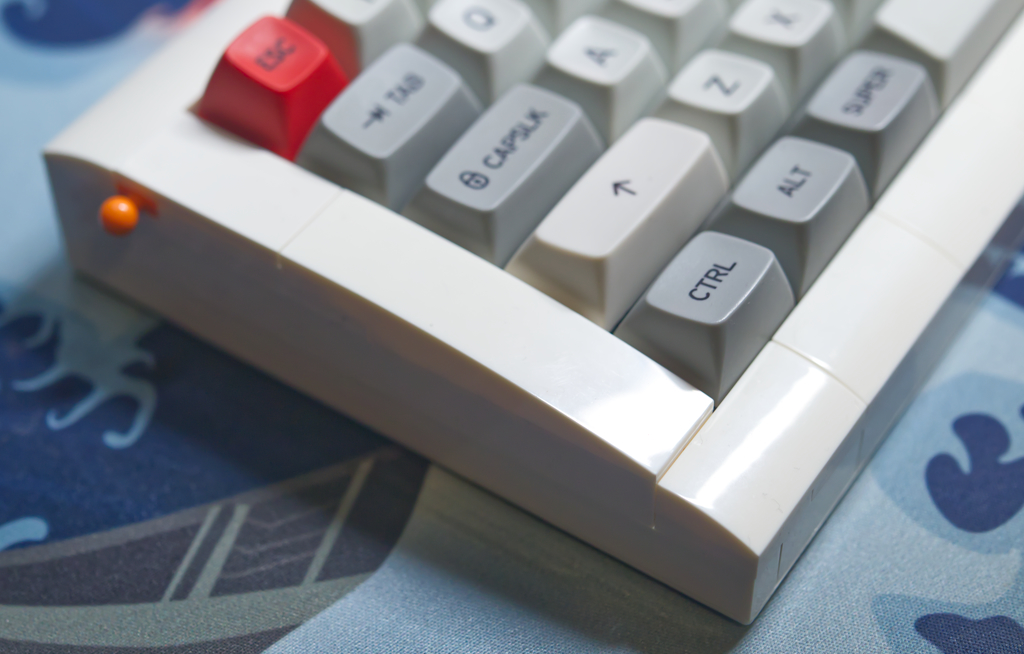
KBDcraft has two main building block keyboards currently, though they can come in different varieties. Their first was Adam and the Lilith followed in October of this year. The biggest difference between the two is the plate mounting. Both are gasket-mount cases, which means the PCB and plate are mounted on gaskets to give a softer typing feel. However, the Lilith has a 5.5º tilt built into the plate mounting. Both feature a 60% layout with arrow keys by shrinking the shift key. I love this layout, it’s a nice compact layout with arrow keys.
Besides that, you may chose the Lilith for the little modular click-on ball and socket joints on the side, or the shape. The Adam has been around longer, and you can easily add a number pad or wrist rest to it. Thanks to these cases being made of building blocks, they’re easy to modularize and customize.
What’s In the Kit?
 There are two kit sizes, and they come in both ANSI and ISO layouts. The full kit includes the case, a PCB board, a coiled cable, stabilizers, their “S² Engine” Switches, their “Keymoji Seele” keycap set, rubber feet, tools, and instructions. The base kit includes everything from the full kit without the 65 S² Engine switches and keycaps. As I was going to bring my own keycaps and switches, I went with the base kit.
Though the base kit doesn’t come with keycaps or switches, it does come with quite a bit. The bricks for the case, a 60% PCB that’s compatible with both Vial and QMK firmware, a POM plastic plate made for the building block case and gaskets, pre-lubed stabilizers, a silencing foam for between the plate and PCB, and a keyboard cable.
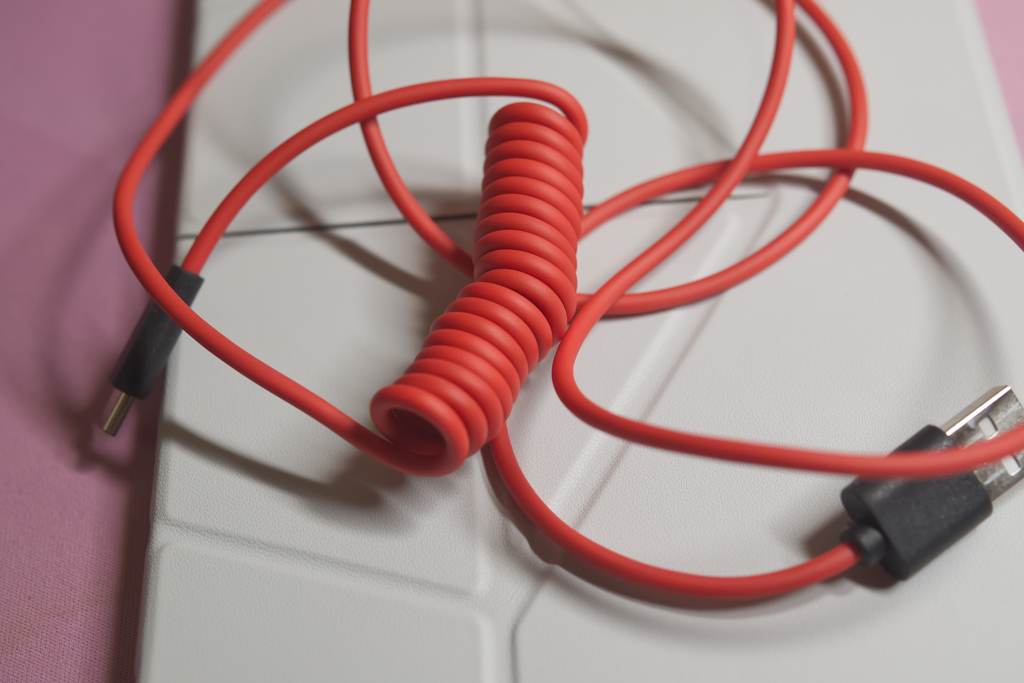
We don’t talk about the cable.
We shouldn’t talk about the keyboard cable though. It’s bad. Expect to use or need another cable. It’ll connect your keyboard to your computer, it’ll just do so terribly. Just toss it aside. It’s the lone bad part of this experience. I’d have preferred a straight cable, honestly. The coil is too short and not very uniform. It just doesn’t look good.
I also added the buildable keyboard display stand and some additional dampening pads to keep the keyboard as quiet as possible. With my Boba U4 switches, I was looking to make this keyboard sound fantastic and quiet.
Finally, KBDcraft includes extras on your order. These are minifigures you can decorate your board with or just use in your other Lego (or Lego-like) building sets.
Construction!
 Let’s face it, a lot of people who are into mechanical keyboards likely were into Lego at some point. I’m not sure how this happened, but if you’re into technology, are interested in building keyboards, and are a little too quick to collect things, you probably love Lego. Building this case was something I was really looking forward to. In fact, before it even came out, years ago, I thought it would be cool to buy the parts for a keyboard and design my own Lego keyboard case to house those parts. Fortunately, KBDcraft did the heavy lifting for me there with this convenient kit!
Building the Case
Normally, when I get a keyboard, the case is in just two parts. Maybe three if there was a weight for the case that was separate. This came in many more parts. Two bags of building bricks and two building brick plates make up the case. The build itself was pretty straightforward. A keyboard case really is just a tray that holds electronics inside, so it’s not a complicated build.
The instructions did have me do a lot on each step, but you’re really not going to get lost here. It was fun putting together my own keyboard from a combination of small pieces. A lot of thought went into making the entire build process feel like building a Lego set, even the parts pertaining to the keyboard electronics had Lego-like instructions.
While I had a lot of fun with this, and appreciate the effort that went into making such a fun kit, there are some downsides. First, the brick quality is far below what you’d expect from Lego. Think more Mega Blox… or maybe a little worse. They are Lego-compatable, but the fitment is often just a little too tight, with pieces never fully fitting together perfectly. Even the included Minecraft-inspired miniature is stiff and a poor build quality. Cute, yes. But tough to actually press together and into place on the board.

You can see how the curve isn’t subtle, with each of these rectangles flat against the sides.
Also, the entire keyboard is bowed. Lego isn’t precise. So, when the plate is slightly larger than the building blocks it’s inside, there are two options. Trim the plate for the keys down, or just bend it a little. The force from doing the latter, along with the poor quality bricks, leads to a keyboard that is ever so slightly bent. It doesn’t rock around on a table, but it’s clear that, without the small rubber pads on each corner, it would. I don’t really notice it though.
Could Real Lego Work?

This holds the keyboard vertical. It seems strong enough.
Yes and no. Lego sets aren’t cheap. If this had been made out of real, official Lego bricks, it would have cost more. Still, I think I would have bought it. The mechanical keyboard community, especially those interested in buying a kit and assembling a keyboard from parts, will definitely be interested in high-end boards. I think they could have gotten away with offering an upgrade to official Lego. Obviously it couldn’t be an official Lego kit, but they could offer the parts for sale to build it out of real Lego bricks. I think that would help prevent bowing a little, and improve the build quality. On top of that, they could shave a little space off the plate so it isn’t crammed in so tight. Combined, the quality of the board would be much higher. As it is, it’s very obvious you’re working with knock-off parts. Still fun, for sure, and well designed too. But you’re going to wish it was real Lego during the build. You won’t think about it too much after the fact.
The Standard Keyboard Parts

The assembled keyboard plate, ready for the case
Now, there’s the normal parts you find in a keyboard kit. KBDCraft was quite generous here. The plate is a flexible POM plate, considered good for softening the feel of a keyboard a little. The PCB can take programming from Vial as well as QMK, though I didn’t try the latter because Vial worked quite well. They also included a foam pad for between the PCB and the plate, even on the base kit. That was a welcome touch. Most of my keyboards don’t have this, and I wish they all did, it really improves the sound of the board, making it less likely to upset coworkers and roommates or partners as well. They’re often custom-made for plates and layouts, so usually only in far more expensive kits. What a treat to find it here!
The switches hold the plate and PCB together. I normally would prefer to at least see two screws here, preferably four on the corners. Just something that is holding the keyboard sandwich together other than the switches. However, I haven’t run into any issues with this construction technique in the past, and I’ve seen it on a few kits before. This kind of setup can also help a board feel more flexible, which is desired for a softer bottoming out on the keys and for, again, a better sound. It’s not a cost consideration, just a style choice.

Perfectly compatible with real Lego too!
Included are also some gaskets with holes made to fit in the building bricks. They’re a bit thin, but softer than some other gaskets I’ve used. I’ve put together some gasket mount boards that had gaskets so dense the board might as well have had screws securing the plate to the case of the board. These are thin, but have some play in them. The plate will sit on the foam, not the building brick studs.
I’ve also got to give the stabilizers a shout-out. I’ve hand lubed stabilizers before, clipping the rattling posts from the bottom of them and adding tape to my PCB to soften the contact between the stabilizers and the board. However, these convenient, pre-lubed stabilizers, the “Stabi JKW” stabilizers, are fantastic. They didn’t need to be clipped and sounded clean out of the box. There’s a very slight rattle in the space bar and some ping in the shift key, but these are, generally, better than my attempts at quieting my stabilizers, fresh out of the box. I wrote praise for their stabilizers a few time in my review, and can say it’s one of those little things that make even an inexpensive kit like this feel high-end. Really great to have these included with the kit, especially at such a reasonable price. It’s not something you’d even think about unless you’ve built other kits and lubed your stabilizers yourself, just to end up with something that doesn’t sound this good.
Basically? The stuff that isn’t Lego-like in this build is in a realm of high-end mechanical keyboards. I didn’t expect to get such a good quality kit for this price, and have been pleasantly shocked. Budget board prices with quality feel.
The Path Not Traveled

This becomes the keyboard case!
So, I do want to take a second to discuss what I didn’t get from the full kit. First, the S² Engine key switches. KBDCraft did send me two of these switches, perhaps as a marketing tool to push me back to the site to get them for myself. There’s just one problem: I really don’t like linear switches. When I first started getting mechanical keybaords, I was sold on a feature made to reduce repetitive stress injuries. You ever feel a kind of ache in your fingers after a long day of typing? That’s the early signs of it. Pounding your fingers on a hard surface will eventually wear them down. Tactile and clicky key switches provide a tactile bump that tells you to stop pressing on the key. It reduces the force of bottoming out. Linear switches don’t have this, which means you may be moving your fingers more, but you’re still bottoming out most of the time. When I first got into this hobby a long time ago, it was a generally understood fact: you get linears for gaming, tactile or clicky for typing.
But linears still sound and feel better to type on than membrane keyboards and laptop keyboards, so they caught on as people’s “everyday switch.” If you’re looking to use linear switches, these seem to be good ones. They came pre-lubed, and move smoothly. Bottoming them out produces a nice thock. If you’re a fan of “thocky” keyboards, fill your plate up with these and you’ll hear each echoing thock. For me? I’ve got my headphones in when I work, sound doesn’t matter much to me. Tactility has always been more important. Perhaps that’s why I like some switches others have moved on from or never used, like Box Royals and Zealios V2. Tactility over thockiness may be my opinion, but if you have a different one, these certainly are thocky.
Next, the keycaps. Nothing wrong with them at all. They’re a cool kit of “keymoji.” Basically, you have both purple and white colorways for the alphas on the keyboard. Using this, you can make your keyboard have a fun face, create an emoji, or maybe spell something out. They introduce a bit of creativity. A full kit will run you only $29.99, a good deal for keycaps. The TKL set is $25.99, so it might be best to just grab the full set in case you want to do a number pad one day. I unfortunately don’t have the details on what these are made of or how their legends are put on the keycaps. That was part of the reason I passed on them. The main reason though? I have a ton of unused keycaps and figured I could save some money using one of my other sets, an MT3 set from Drop. I did need to borrow the shift and delete keys from another keycap set I had, but it’s close enough that I’m not too bothered by it.
Sound and Feel
 Sound and feel make up a significant portion of why someone would buy a mechanical keyboard. However, these are subjective, and formed from a variety of parts. The construction and materials of the case, the rubber on the feet, the gaskets, the plate material, foam materials, keycap selection, lubrication and type of lube, switches themselves, the material your desk is made of. At this point, there’s so much that goes into making a keyboard it’s practically a work of art.
That said, this setup, with my quiet and tactile Boba U4 switches (thanks Ringer Keys!), PBT MT3 keycaps, and KBDCraft’s case, plate, PCB, and stabilizers, I can say, this is one of my best sounding and feeling keyboard builds. The pieces work together so well to create something that is fun to type on, feels nice to type on with a nice, soft bottoming out, and sounds great. I was surprised that a kit that includes knock-off Lego bricks would become something that has such a high-end typing experience, but it really does come together nicely.

Note: the rubber has slipped around too.
I will say there are two flaws. First, the angle of the plate could be a bit higher, or at least it could come with bottom plates that allow me to add height in the back with Lego bricks. Secondly, the rubber feet should be thicker. This is not just to account for the bowed keyboard case, but also to add more grip to the keyboard. This is an incredibly light keyboard setup, and it slips around a lot. It could use some grip on the bottom to keep it in one place.
My typing speed is usually above 100 words per minute (WPM). Occasionally I’ll make mistakes and it’ll dip down to 90, or go up to 130, but generally it stays in the 100-110WPM range. My first typing test with this was a 113, which is very good. It’s comfortable enough to type on to type at a fast speed. I’m happy with it, even if it’s not quite the perfect angle for me.
My Own Keycaps and Switches
 I don’t want to spend too much time on the parts I brought to this kit. I selected the switches because I, incorrectly, thought that the keyboard would be noisy, being made of building bricks. One thing that did work well with this is the MT3 keycaps. Due to the low angle of the plate, the higher profile caps with tops angled towards the home row help immensely. This wasn’t intentional on my part, but it certainly works out for me. I will note that I had to use some additional keys from another kit because I didn’t have a 2-unit shift key, a 1-unit shift key, a 1-unit command key, a 1-unit Fn key, or a fourth row delete key. My kit was made for 65% keyboards, and this is a 60% keyboard. Fortunately, I had extra keys in a similar colorway that don’t look too out of place. Besides, a kit that is imperfect just reminds me of the garbled bin of parts I used to make my custom Lego creations out of!
As for the switches, I do love these Boba U4 switches. The silencing silicone does take away a crisp feel you get from most mechanical keyboards, but it does have some fantastic tactility and it’s hard to beat that tactility. The switch has a large rounded bump right at the top of the keypress, then drops through to the bottoming out. The keyboard itself as well as these switches makes bottoming out a little mushy, but definitely smooth. It’s quiet and makes it easy to not bottom out and also not punish yourself too much when you do. Rebound is a bit slow, but not so much that I can’t type over 120WPM. Good switch, for sure, I’d get more of these, especially for office builds.
Customization
 Usually, when I customize the firmware on a keyboard, I use QMK. I’ll generate a keymap, usually one that I made to have a few easier-to-access shortcuts and macros on a layer for Android development and debugging, and then I’ll compile it and load it onto my keyboard. When I tried that, this keyboard didn’t respond. Permissions issues, I assume. I decided to look up Vial, rather than trying to change it from the stock Vial setup to QMK manually.
Vial is a QMK fork, meaning if you have a new QMK board, you can likely use Vial with it. It’s a lot like Via, only, unlike Via, I found it actually worked. Via hasn’t worked for me since they moved to a web app, and I’ve used my old Via app for anything requiring it. Vial was so quick and easy, I expected more steps. I just configured my key setup online through the web app, and it was live. Smoothest customization I’ve had.
Other Stuff
 Shipping took almost three weeks, so that’s definitely something to consider. Perhaps the most annoying part was that the shipping partner never gave me the USPS tracking number once it was handed off, and they updated the status on a strangely inconsistent basis. Sometimes I’d have no updates for days, only to find it had been moving towards me the entire way.
Another thing I’ll point out is that this build assumes you’ll have any tools required for changing keycaps and switches. I’ve got so many they’re practically overflowing out of my drawers. Still, it’s worth noting that, while many keyboard kits include the obligatory keycap and switch puller, this one doesn’t, so you’ll need your own if you somehow don’t have one already.
I do think they may be planning an expansion, like they did for the Adam. On the Adam, you can get a keypad that fits into the design and shape of the keyboard. You can connect them together or assemble your keyboard with it built-in. KBDCraft does this with a small cable between your keyboard and the PCB of the number pad. They included this cable with this build, so it’s possible they’re planning on releasing a modular version of the Lilith keyboard as well.
There’s a lot of personality in this board. From the Evangelion lore-inspired naming and marketing, the cute instructions and clean packaging, even the little extras. There’s a lot of care and consideration into this project, and I do like seeing that. So often, keyboards are just churned out by a company, and it’s nice to see something that’s made by someone who seems to care about their craft.
Overall
 This was a really fun experience. It reminded me that I haven’t bought a Lego set in a while and was missing just sitting down on the floor and putting something together. As I get older, it would probably be better to do that on a desk because it’s a lot of hunching over, but you just can’t beat tradition. I’ve got a lot of fond memories of sitting in a pile of Lego and building whatever my heart desired.
It was a lot of space ships, if we’re being honest. I really like space ships.
Yes, there were issues here. We won’t talk about the cable. The entire board is slightly bent. These are not Lego, they’re just Lego-like. All of that aside, it was a fun build. The end result is a surprisingly great keyboard, and not flimsy either. It’s rigid. It’s a good build, it really is. I was skeptical at first. I thought this would be a novelty, just something I build for the fun of saying I built a “Lego keyboard.” Instead, I could see using this as a regular part of my keyboard rotation. I will most certainly continue using this keyboard long after this review is ancient. It’s a good keyboard, and a ton of fun. I’m really glad something like this exists and I took a chance on it.
If you want one for yourself, you can find them on KBDCraft’s website. It’s $109.99 for the full kit and $64.99 for the base kit. You may also want to add some sound pads to make sure it’ll be quiet, and an extra pack of rubber feet to elevate the back of the keyboard a bit and reduce the chance of it moving around. For a mechanical keyboard setup like this, that’s a fantastic price, and definitely worth taking a look if you like keyboards and Lego.